Getting up and running remote with docker
About
The project is Docker based. That means, the development requirements are just Docker and Docker Compose. Every other dependency will be automatically installed in a container. So the host system stays clean and every developer has the same dependencies!
Since the project need some beefy hardware and a strong network connection, it’s recommended to use a Remote Server. But it’s also possible to set up everything on the Localhost.
To start developing fast, it’s recommended to use VS Code as IDE. Facebook & Microsoft created an extension to Remote Development, with this extension is it possible to use a remote server like it is in front of you.
Localhost
Remote Server
Note
This tutorial is tested on Ubuntu 18.04, it should also work under other
Debian server.
Tested server hoster
Hoster |
Status |
|---|---|
Unstable: threats limits |
|
Works fine |
|
Works fine |
|
Works fine |
Setup server
At first connect to your remote server via SSH like.:
$ ssh root@your-server-ip
Update the server.:
$ sudo apt-get update
$ sudo apt-get dist-upgrade
Create a new user (in this case foo) and add him to the sudo group.:
$ adduser foo
$ adduser foo sudo
Log into your new user.:
$ su foo
$ cd
Add to ~/.ssh/authorized_keys your ssh public key. If you don’t have an SSH
key, go to Ubuntu Wiki OpenSSH
to see how to create one.:
$ mkdir ~/.ssh
$ nano ~/.ssh/authorized_keys
Secure SSH to only allow to log in as non-root user and via ssh key.:
$ sudo nano /etc/ssh/sshd_config
Change PermitRootLogin yes to PermitRootLogin no and
PasswordAuthentication yes to PasswordAuthentication no. Then press F2
and y and enter to save the file.
After changing the file, reload the SSH service.:
$ sudo /etc/init.d/ssh reload
Setup firewall with ufw, for a detail instruction go to
Ubuntu Wiki firewall.:
$ sudo apt-get install ufw
$ sudo ufw default allow
$ sudo ufw allow ssh
$ sudo ufw allow 22
$ sudo ufw deny 4243
$ sudo ufw enable
$ sudo ufw status
Next install Docker, this is a quick instruction, for a more complex instruction go to docs.docker.com/install!:
$ sudo apt-get install \
    apt-transport-https \
    ca-certificates \
    curl \
    gnupg-agent \
    software-properties-common \
    python-pip \
    python-setuptools \
    python3-pip \
    python3-setuptools
$ curl -fsSL https://download.docker.com/linux/ubuntu/gpg | sudo apt-key add -
$ sudo apt-key fingerprint 0EBFCD88
$ sudo add-apt-repository \
"deb [arch=amd64] https://download.docker.com/linux/ubuntu \
$(lsb_release -cs) \
stable"
$ sudo apt-get update
$ sudo apt-get install docker-ce docker-ce-cli containerd.io
Test if docker works.:
$ sudo docker run hello-world
$ sudo pip3 install docker-compose
Add user foo to docker group, to run docker commands without sudo.:
$ sudo usermod -aG docker foo
Logout & login again to enable the changes. Then test if the user can use docker commands.:
$ docker run hello-world
Enable the docker API for localhost. For that edit the file
/lib/systemd/system/docker.service and change the line beginning with
ExecStart= to ExecStart=/usr/bin/dockerd -H fd:// -H tcp://localhost:4243.:
$ sudo nano /lib/systemd/system/docker.service
    #  change ExecStart= -> ExecStart=/usr/bin/dockerd -H fd:// -H tcp://localhost:4243
$ sudo systemctl daemon-reload
$ sudo systemctl restart docker
To test if the api access works, create a http request.:
$ curl -X GET http://localhost:4243/images/json
[{"Containers":-1,"Created":1546306167,"Id":"sha256:fce289e99eb9bca977dae136fbe2a82b6b7d4c372474c9235adc1741675f587e","Labels":null,"ParentId":"","RepoDigests":["hello-world@sha256:9572f7cdcee8591948c2963463447a53466950b3fc15a247fcad1917ca215a2f"],"RepoTags":["hello-world:latest"],"SharedSize":-1,"Size":1840,"VirtualSize":1840}]
Next setup GIT. To install just use apt-get.:
$ sudo apt-get install git
To configure git use.:
$ git config --global user.name "user_name"
$ git config --global user.email "your_email@example.com"
Create a new github SSH key, for deployment new commits.:
$ ssh-keygen -t rsa -b 4096 -C "your_email@example.com"
Add your new generated key to github.com.:
$ cat ~/.ssh/id_rsa.pub
Add the content of ~/.ssh/id_rsa.pub to https://github.com/settings/keys.
At last, download the git repo via SSH. You can use the official repo
git@github.com:OpenHistoricalDataMap/MapnikTileServer.git or use your own
fork.:
$ git clone git@github.com:OpenHistoricalDataMap/MapnikTileServer.git ~/MapnikTileServer
Also download the OHDM version of openstreetmap-carto.:
$ git clone git@github.com:linuxluigi/openstreetmap-carto.git ~/openstreetmap-carto
Now the server is ready to work :)
Setup VS Code
At first download & install VS Code for your desktop OS.
To work on a remote server, install the official Remote Development app. Next configure the access to the remote host, for that open in VS Code. For that click in the left bottom of VS Code on the remote extension.
If you need more information, go to the official docs.

Fig. 10 VS Code - use remote extension
Then select Remote-SSH: Open Configuration File...
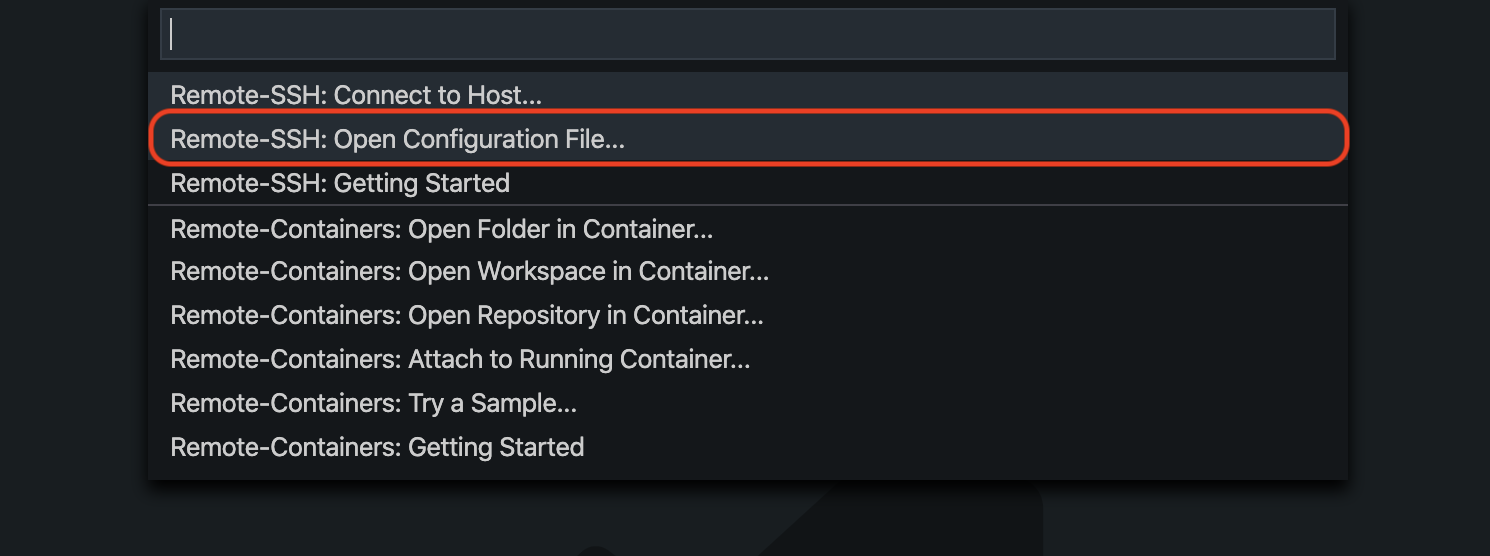
Fig. 11 VS Code - select Open Configuration File
Select your configuration file and then set up your host.:
Host HostShortName
    HostName HostIpAddress
    User foo
    LocalForward 127.0.0.1:4243 127.0.0.1:4243
    LocalForward 127.0.0.1:5432 127.0.0.1:5432
    LocalForward 127.0.0.1:5500 127.0.0.1:5500
    LocalForward 127.0.0.1:5555 127.0.0.1:5555
    LocalForward 127.0.0.1:8000 127.0.0.1:8000
After saving the file, you can now connect to your host via the remote extension.